How to’s | GuidesWindows 11
- How to Install Windows 11 on an Incompatible Windows 10 PC
- Here’s How to Upgrade to Windows 11, Even on Unsupported PCs
- Why Most Older PCs Can’t Upgrade to Windows 11
- First, however: Check Your PC’s Compatibility
- Option 1: Upgrade Using a Registry Tweak (For Semi-Compatible PCs)
- Option 2: Use Rufus for Unsupported PCs (Legacy BIOS, No TPM)
- What If I Want a Clean Install?
- Final Thoughts: Should You Upgrade or Stay on Windows 10?
How to Install Windows 11 on an Incompatible Windows 10 PC

Abdullah Mustapha
April 20, 2025
Microsoft will no longer provide security updates and support for Windows 10 from October 14, 2025, unless you’re willing to pay for the Extended Security Updates (ESU) program. This leaves three realistic choices for most: upgrade to Windows 11, pay for continued support, or run an unsupported operating system.
Here’s How to Upgrade to Windows 11, Even on Unsupported PCs
However, Windows 11 is not always an easy upgrade—especially if your PC is more than five years old. Microsoft’s stringent hardware requirements mean a number of older computers aren’t eligible for the upgrade through official channels. But that doesn’t mean you’re out of luck.
In this tutorial, we’ll guide you through two upgrade paths: one for partly compatible PCs and one for older systems through an unofficial workaround.
Why Most Older PCs Can’t Upgrade to Windows 11
Microsoft has placed stringent hardware restrictions on Windows 11 installations:
- CPU Compatibility: Only CPUs that are on Microsoft’s white list are compatible. Most older CPUs are not.
- TPM Requirement: A Trusted Platform Module (TPM) version 2.0 must be present and enabled. (TPM 1.2 may work in some circumstances.)
- UEFI and Secure Boot: Your computer must be running UEFI (not legacy BIOS), and although Secure Boot does not have to be enabled, it must be supported.
If you try to upgrade an older computer using Windows Update or the Windows 11 Installation Assistant, you’ll likely hit a brick wall since one or more of these features are not present. Fear not, there are workarounds.
First, however: Check Your PC’s Compatibility
Use these tools to determine your PC’s current configuration:
- System Info Tool (msinfo32): Look at the BIOS Mode entry. If it says “Legacy,” you’ll need to convert your system to UEFI and switch from MBR to GPT disk formatting before upgrading.
- TPM Management Tool (tpm.msc): This will show whether a TPM is present and enabled. If the utility says “Compatible TPM cannot be found,” you may have to enable TPM in your BIOS or use the second upgrade path.
- CPU Support for SSE4.2 and PopCnt: These are newer instruction sets required for Windows 11 version 24H2 and later. They are implemented in most Intel CPUs from 2009+ and AMD CPUs from 2013+.
Option 1: Upgrade Using a Registry Tweak (For Semi-Compatible PCs)
This is the ideal approach if your PC has UEFI, Secure Boot support, and a TPM (version 1.2 or above), but an unsupported processor is installed.
Step-by-Step Instructions:
1. Edit the Registry to Bypass CPU/TPM Checks
- Press Windows + R, type regedit, and press Enter.
- Navigate to: HKEY_LOCAL_MACHINE\SYSTEM\Setup\MoSetup
- If there is no MoSetup, create one:
- Right-click the Setup folder > New > Key > Name it “MoSetup.”.
- Right-click on the right pane > New > DWORD (32-bit) Value.
- Name it: AllowUpgradesWithUnsupportedTPMOrCPU
- Double-click the new value and give Value Data the value of 1.
- Restart your PC.
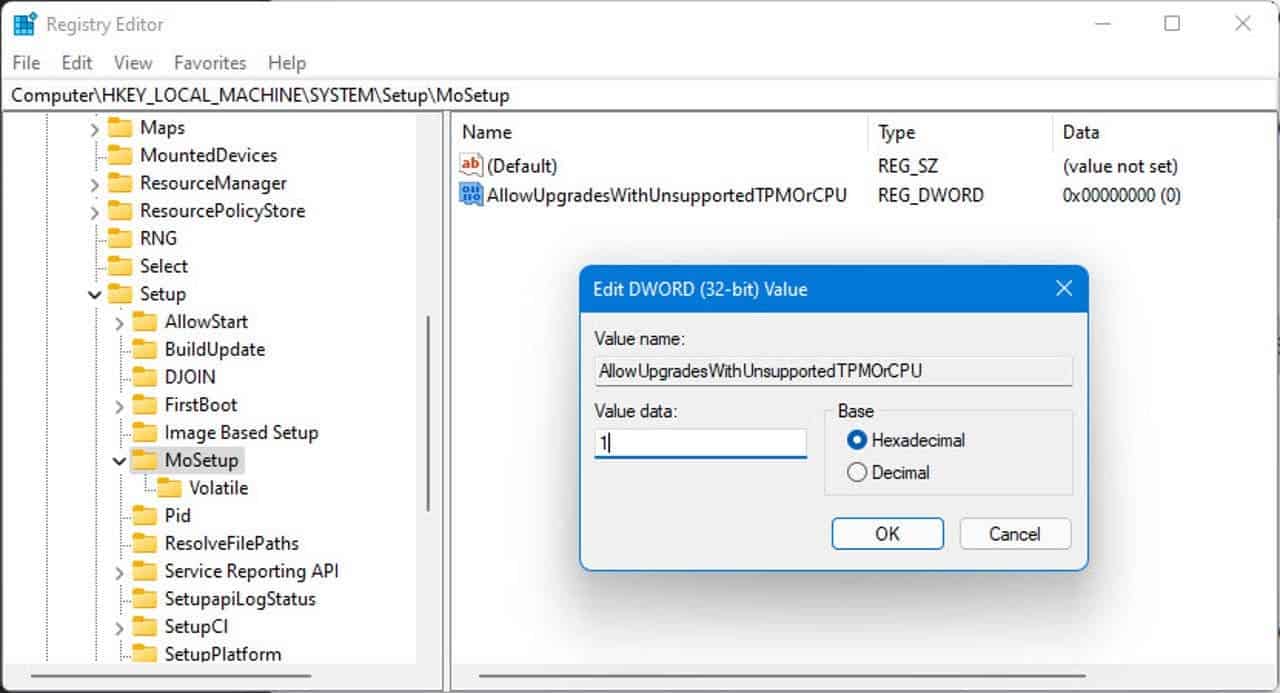 Image Credit: Ed Bott/ZDNET
2. Download the Windows 11 ISO
- Visit the official Microsoft website: Download Windows 11
- Click on “Download Windows 11 Disk Image (ISO)” for x64 machines.
- Save it in your Downloads folder.
3. Mount the ISO in File Explorer
Double-click the ISO file. It will mount as a virtual DVD drive with a new drive letter.
4. Run Setup from the ISO
- Open the mounted drive, and double-click Setup.exe.
- You’ll see a compatibility warning. Click Accept to bypass it.
- Choose one of the following:
- Full Upgrade: Keep apps, settings, and files.
- Keep Data Only: Reset apps and settings.
- Clean Install: Wipes everything.
- Windows will now begin the upgrade process.
Read Also: Microsoft Begins Rolling Out Its Long-Awaited Recall Feature
Option 2: Use Rufus for Unsupported PCs (Legacy BIOS, No TPM)
In case your PC does not support it at all—no TPM, no Secure Boot, or even still on Legacy BIOS—you will need to take a different route. That is where Rufus, a free, powerful utility, comes in.
How It Works
Rufus creates a bootable Windows 11 USB installer, disabling hardware requirement checks along the way. It’s especially useful for PCs that would otherwise be blocked entirely.
Important: This procedure will not bypass the CPU requirements introduced in Windows 11 release 24H2, such as the SSE4.2 and PopCnt instruction sets.
What You’ll Need:
- A USB drive (16 GB or more)
- A copy of the Windows 11 ISO
- The Rufus application (version 4.6 or newer)
Step-by-Step Instructions:
- Download Rufus from the official website or Microsoft Store.
- Open Rufus and insert your USB drive.
- In “Boot Selection,” select Disk or ISO image, click Select, and pick the Windows 11 ISO.
- Click Start.
- A window will pop up with the title “Windows User Experience.” Check:
- Remove requirement for TPM and Secure Boot
- Remove requirement for 4GB+ RAM and Secure Boot, if required
- Click OK, then wait for the USB creation.
- When done, open the USB drive in File Explorer and run Setup.exe.
- Do not boot from the USB drive and attempt a clean install—that will re-enable the compatibility checks. Always run Setup from within Windows.
Like with the first method, you’ll get a compatibility warning. Click through it, and the upgrade should proceed.
What If I Want a Clean Install?
You can always perform a clean installation by booting from the USB created in either method, but keep in mind:
- All your files, apps, and settings will be erased.
- A TPM and Secure Boot support is still needed (except with Rufus-modified installs).
- You’ll need to reinstall your software and restore data from backups.
This is a great option if you’re starting fresh or experiencing performance issues on your current installation.
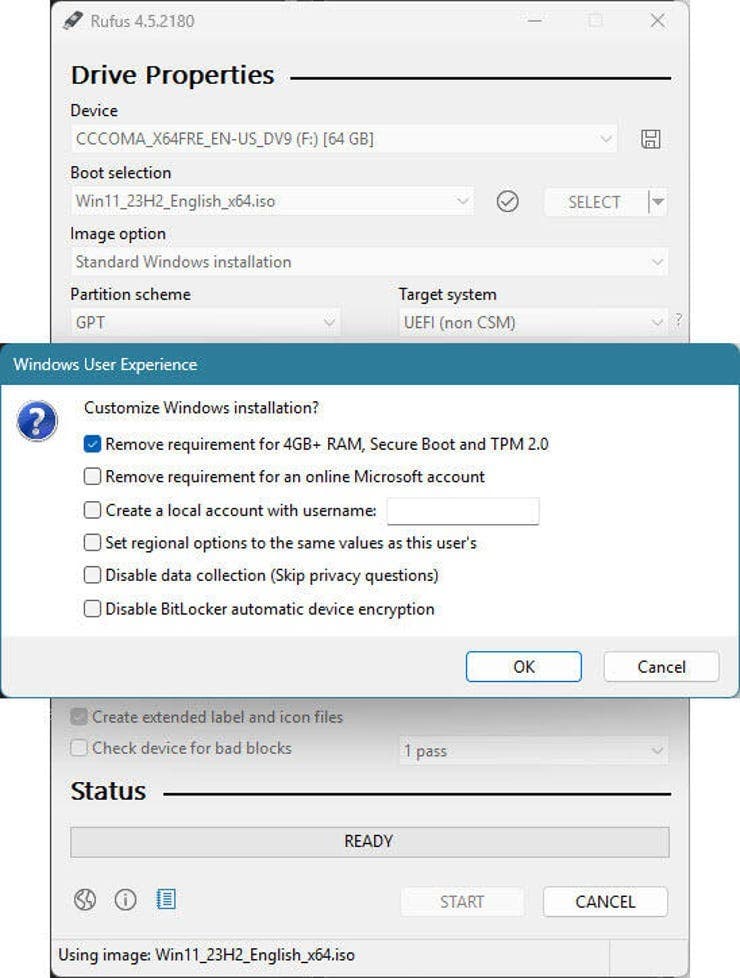 Screenshot by Ed Bott/ZDNET
Final Thoughts: Should You Upgrade or Stay on Windows 10?
As Windows 10 is end-of-life in October 2025, staying on it without security updates is a risk. Even though Microsoft offers extended security updates, they’ll come at a cost.
For the majority of unsupported PC users, these options represent a viable way of staying on an up-to-date, secure operating system without breaking the bank for new hardware. With that said, however, if your computer is relatively old (pre-2010), it might be time to consider investing in a newer system.
Whichever direction you decide to go, make sure to back up your data before upgrading and research compatibility thoroughly to avoid any surprises during installation.
Disclaimer: We may be compensated by some of the companies whose products we talk about, but our articles and reviews are always our honest opinions. For more details, you can check out our editorial guidelines and learn about how we use affiliate links.Follow Gizchina.com on Google News for news and updates in the technology sector.
Source/VIA :
Zdnet