How to’s | GuidesnewsTech
- How to upgrade an unsupported Windows 10 PC to Windows 11 for free
- Understanding the upgrade roadblocks
- Option 1: Upgrade by making a straightforward registry change
- Step 1: Make registry changes.
- Step 2: Get the Windows 11 ISO
- Step 3: Mount the ISO
- Step 4: Run Setup from within Windows 10
- Option 2: Use Rufus to bypass all checks
- Step 1: Download Rufus and the Windows 11 ISO
- Step 2: Create a bootable USB with bypass options
- Step 3: Run Setup from the USB—without booting from it
- Why clean installs still require caution
- What won’t work anymore
- Conclusion
How to upgrade an unsupported Windows 10 PC to Windows 11 for free
Efe Udin

April 27, 2025
Generally, Microsoft discourages upgrades of older hardware, but users need new features, and a few workarounds still work. With official support for Windows 10 ending on October 14, 2025, many users are looking to upgrade — even if their hardware doesn’t meet Microsoft’s strict Windows 11 requirements. If your PC was built with Windows 10 in mind but isn’t passing the compatibility checks for Windows 11, don’t worry: there are still reliable ways to install the new OS without paying for extended updates.

Microsoft’s policy blocks many PCs with older CPUs or lacking Trusted Platform Module (TPM) 2.0 from upgrading via standard tools like Windows Update. However, there are workarounds, and the upgrade is usually stable and free. This guide explains two tried-and-true techniques: a straightforward registry change and a Rufus USB upgrade.
Understanding the upgrade roadblocks
Before starting, it’s useful to understand what prevents your system from upgrading. If your PC is older than five years, it may trigger a compatibility error — usually due to an unsupported CPU or lack of TPM 2.0.
New restrictions introduced with the Windows 11 24H2 update add another hurdle: the CPU must support SSE4.2 and PopCnt instructions. Most Intel CPUs from 2009 onward and AMD CPUs from 2013 onward support these features, but anything older might be permanently ineligible.
Another common issue is BIOS mode. Your system must be configured to use UEFI, not Legacy BIOS, and your disk must use GPT partitioning. Secure Boot must also be supported, though it doesn’t need to be turned on.
To check your system’s compatibility:
-
Open msinfo32.exe and review the BIOS Mode.
-
Run tpm.msc to see if TPM is present and enabled.
If your PC uses Legacy BIOS or has no TPM at all, skip ahead to the second method involving Rufus.
Option 1: Upgrade by making a straightforward registry change
You can upgrade your system with the official Windows 11 ISO and a registry change if it has a TPM (even version 1.2), supports Secure Boot, and is running UEFI.
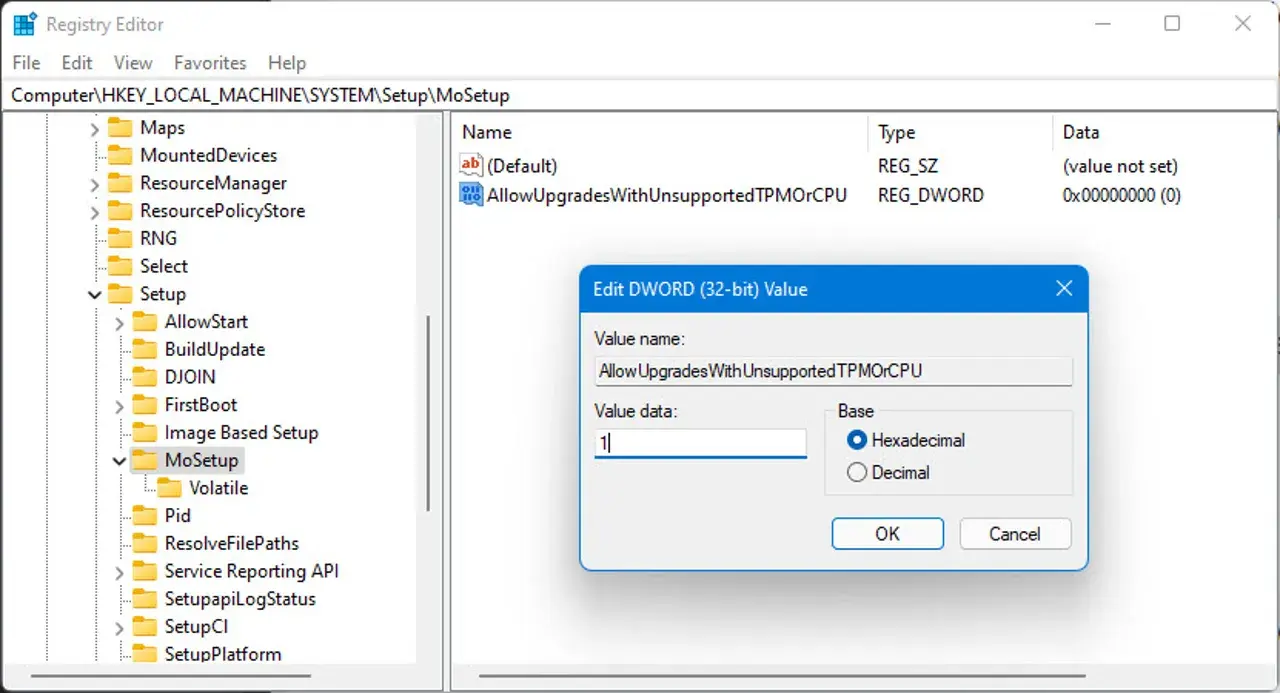
Step 1: Make registry changes.
- Launch Regedit.exe, then go to: HKEY_LOCAL_MACHINESYSTEMSetupMoSetup
- Create “MoSetup” if it doesn’t already exist. Make a new DWORD (32-bit) value inside that key with the following name: AllowUpgradesWithUnsupportedTPMOrCPU
- Permit Upgrades With Unsupported CPU and TPMOr
- Restart your computer after setting the value to 1.
Step 2: Get the Windows 11 ISO
Choose “Download Windows 11 Disc Image (ISO) for x64 devices” after visiting aka.ms/DownloadWindows11. Put it in the Downloads folder.
Step 3: Mount the ISO
Double-clicking the ISO file after downloading will mount it. In File Explorer, it will show up as a new drive.
Step 4: Run Setup from within Windows 10
Open the mounted drive and double-click Setup.exe. You’ll see a compatibility warning, but it’s safe to click through. From there, choose your preferred upgrade option: retain everything, keep only files, or perform a clean install.
This method does not work if you boot from USB. It must be launched from within Windows 10.
Option 2: Use Rufus to bypass all checks
For older PCs that lack a TPM or support for Secure Boot, the above method won’t work. In such cases, Rufus provides an effective workaround.
Read Also: How to Install Windows 11 on an Incompatible Windows 10 PC
Step 1: Download Rufus and the Windows 11 ISO
First, download Rufus version 4.6 or later. Older versions won’t bypass Microsoft’s updated compatibility tools. Then, download the Windows 11 ISO from Microsoft’s website.
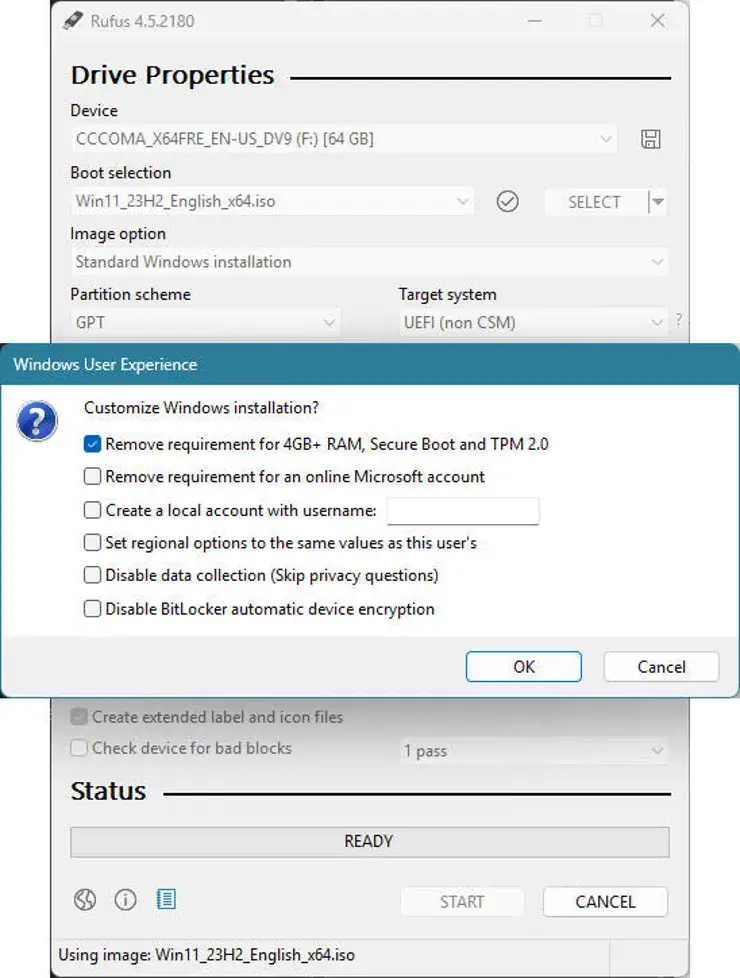
Step 2: Create a bootable USB with bypass options
Open Rufus and insert a USB drive (at least 16 GB). Select “Disk or ISO image,” then choose the Windows 11 ISO. Click “Start,” and in the User Experience dialog, check the option to “Remove requirement for Secure Boot and TPM.”
Proceed with the creation. Rufus modifies the installation media so it skips all hardware checks.
Step 3: Run Setup from the USB—without booting from it
Insert the USB into your Windows 10 PC. In File Explorer, open the drive and double-click Setup.exe. Do not boot from the USB, or you’ll end up performing a clean install without bypassing checks.
Click through the compatibility warning to begin your upgrade.
Why clean installs still require caution
If you’re considering a full reinstall instead of an upgrade, know that booting from media to do a clean install won’t bypass TPM and Secure Boot checks. Only the upgrade route via Setup.exe (as described above) avoids those restrictions. You’ll also lose apps and personal settings with a clean install, so weigh the pros and cons carefully.
What won’t work anymore
Some earlier tricks, like manually deleting or replacing the appraiserres.dll file, no longer function reliably, especially since Microsoft’s 2024 updates hardened the Setup process. That’s why the Rufus method is now preferred for systems with no TPM or unsupported BIOS.
Additionally, PCs with very old CPUs that lack SSE4.2 and PopCnt cannot be upgraded to Windows 11 24H2 under any method. For those, staying on Windows 10 or switching to Linux may be the only viable paths.
Always back up your data before any upgrade, especially if you plan to do a clean install or change BIOS settings. Consider creating a system image or recovery drive in case something goes wrong. If you’re unsure about your PC’s capabilities or BIOS configuration, you might want to stick with Option 2. It’s more forgiving of older hardware and handles most of the hard work automatically.
Conclusion
While Microsoft has tightened its upgrade rules for Windows 11, determined users with older PCs still have two reliable paths to make the leap — either with a registry tweak or using Rufus. As long as you understand your hardware’s limits and proceed carefully, upgrading doesn’t require buying a new machine or subscribing to Microsoft’s Extended Security Updates. If you’re planning to upgrade soon, take a moment to explore your PC’s specs and choose the right method. It might just buy your device a few more years of modern Windows use — at no extra cost.
Disclaimer: We may be compensated by some of the companies whose products we talk about, but our articles and reviews are always our honest opinions. For more details, you can check out our editorial guidelines and learn about how we use affiliate links.Follow Gizchina.com on Google News for news and updates in the technology sector.
Source/VIA :
zdnet